 on other users’ behalf in Public Community using Connected App, Named Credential, Auth. Provider, REST API.")
Have you ever hit a block wall when implementing a Community / Public Site because you wanted to access resources unavailable for Site Users, especially resources in managed packages? If yes, perhaps, this article can help you.
In Salesforce Community, it is running on Site User permission with Public Community / Site; there is minimal access to resources/API. Mostly, without sharing, perhaps you can bypass the sharing security. However, accessing objects, APIs, and services from Managed Packages without sharing cannot solve the issues. The Site needs to access the resources in another user context. How can we do that? Object, there are several ways, such as scheduled classes, Platform Events..etc., but this only running in the background; what we need is you can access the resources in real-time. You will have to create a REST API and use callout to execute it with the credential of the rightful user, for example, Admin.
Create Connected Apps:
To learn more about the Connected Apps, please access this trailhead: https://trailhead.salesforce.com/content/learn/modules/connected-app-basics. The connected app enables applications to integrate with Salesforce using APIs.
- From Salesforce -> Setup -> App Manager
- Click on New Connected App
- Connected App Name: CallAPI
- API Name: CallAPI
- Contact Email: Your Email
- Enable OAuth Settings: Checked
- Callback URL: HTTP://localhost; leave this for now; we will need to change this one later
- OAuth Scopes: api, refresh_token, offline_access
- leave default values for the rest and save
- Changes can take up to 10 minutes to take effect.

Click on Manage Consumer Details and record the Consumer Key / Secret pair; we will need its later.
Create Auth. Providers:
To learn more about Authentication Providers, please access https://help.salesforce.com/s/articleView?id=sf.sso_authentication_providers.htm&type=5 and https://help.salesforce.com/s/articleView?id=sf.sso_provider_sfdc.htm&type=5. The Auth. Provider allows your Salesforce org to access protected third-party data on behalf of users; in this case, our being created REST API.
- From Salesforce -> Setup -> Auth.Providers
- Click New
- Provider Type: Salesforce
- Name: OurSalesforceOrg
- URL Suffix: OurSalesforceOrg
- Consumer Key: The key you got from Connected App
- Consumer Secret: The Secret you got from Connected App
- Default Scopes: api refresh_token
- leave default values to the rest and Save

Now copy the Callback URL of the Auth. Provider; Then, edit the Callback URL of the Connected App.

We have Connected APP and Auth. Provider; next, we are going to create Named Credential.
Create Named Credential:
A named credential specifies the URL of a callout endpoint and its required authentication parameters in one definition. https://developer.salesforce.com/docs/atlas.en-us.apexcode.meta/apexcode/apex_callouts_named_credentials.htm. When you combine Named Credential with Auth. Provider, you can make a call-out on behalf of the authorized user.
- From Salesforce -> Setup -> Named Credentials
- Click New Named Credential
- Label: Call Our Salesforce API
- CallOurSalesforceAPI
- URL: Your My Domain URL
- Identity Type: Named Principal
- Authentication Protocol: OAuth 2.0
- Authentication Provider: The created Auth. Provider in the previous step (OurSalesforceOrg).
- Scope: api refresh_token
- Uncheck and Check on Start Authentication Flow on Save.
- Leave defaults to the rest and Save.
- It should redirect to the login page; you must log in with the desired user then Allow Access.
- If successful, you can see the authorized user in Authentication Status:

Create REST Web Services for Testing:
Please access: https://developer.salesforce.com/docs/atlas.en-us.apexcode.meta/apexcode/apex_rest.htm to learn more about APEX REST Web Service.
@RestResource(urlMapping='/TestAccountService/*')
global with sharing class AccountREST {
	@HttpPost
    global static String createAccount(string AccountName){
        //In here you can create some crazy logic with resources available to authorized users.
        //Resources in Managed Packages if the authorized users got assigned licenses.
        Account acc = new Account(Name=AccountName);
        insert acc;
        return 'Success';
    }
}
public with sharing class AccountRestService {
private static string createAccountRest(string accountName){
HttpRequest req = new HttpRequest();
req.setEndpoint('callout:CallOurSalesforceAPI/services/apexrest/TestAccountService');
req.setMethod('POST');
req.setTimeout(120000);
map<string,string> selapp = new map<string,string>();
selapp.put('accountName',accountName);
req.setBody(JSON.serialize(selapp));
req.setHeader('Content-Type', 'application/json');
Http http = new Http();
system.debug(req.getBody());
HTTPResponse res = http.send(req);
return res.getBody();
}
@AuraEnabled
public static String createNewAccount(String accName){
try {
string result = createAccountRest(accName);
return result;
} catch (Exception e) {
return e.getMessage();
}
}
@AuraEnabled
public static String createNewAccountNormal(String accName){
try {
Account acc = new Account(Name=accName);
insert acc;
return 'Success';
} catch (Exception e) {
return e.getMessage();
}
}
}Note that to call Named Credential, we use callout:<name>
<!--createAccountLWC.html-->
<template>
    <div class="slds-m-top_medium slds-m-bottom_x-large">
        <!-- Default/basic -->
        <div class="slds-p-around_medium lgc-bg">
            <lightning-input type="text" label="Account Name" onchange={handleChange} value={accountName}></lightning-input>
            <lightning-textarea name="input1" label="Results" value={result} ></lightning-textarea>

        </div>
        <div class="slds-p-around_small lgc-bg">
            <lightning-button variant="brand" label="Call REST Create Account" title="" onclick={handleCreateAccount} class="slds-m-left_x-small"></lightning-button>
            <lightning-button variant="brand" label="Call Create Account" title="" onclick={createNewAccountNormal} class="slds-m-left_x-small"></lightning-button>
        </div>

    </div>
</template>
//createAccountLWC.js
import { LightningElement } from 'lwc';
import createNewAccount from '@salesforce/apex/AccountRestService.createNewAccount'
import createNewAccountNormal from '@salesforce/apex/AccountRestService.createNewAccountNormal';
export default class CreateAccountLWC extends LightningElement {
accountName ='';
result = '';
handleCreateAccount(){
console.log( this.accountName);
if(this.accountName){
createNewAccount({accName:this.accountName})
.then((result)=>{
this.result = result;
this.accountName = '';
}).catch((error)=>{
console.log('error: ',error);
})
}
}
createNewAccountNormal(){
console.log( this.accountName);
if(this.accountName){
createNewAccountNormal({accName:this.accountName})
.then((result)=>{
this.result = result;
this.accountName = '';
}).catch((error)=>{
console.log('error: ',error);
})
}
}
handleChange(event){
this.accountName = event.target.value;
}
}<?xml version="1.0" encoding="UTF-8"?>
<LightningComponentBundle xmlns="http://soap.sforce.com/2006/04/metadata">
<apiVersion>55.0</apiVersion>
<isExposed>true</isExposed>
<targets>
<target>lightning__RecordPage</target>
<target>lightning__AppPage</target>
<target>lightningCommunity__Page</target>
<target>lightningCommunity__Default</target>
</targets>
</LightningComponentBundle>Testing to Create New Account:
I assume that you know how to create a public community page. Also, you will need to add site permission to access AccountRestService. https://help.salesforce.com/s/articleView?id=sf.networks_creating.htm&type=5

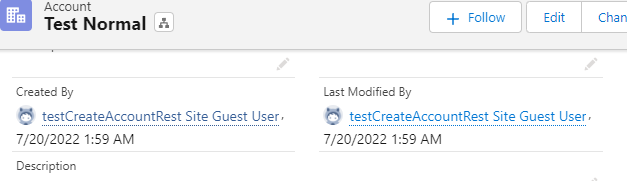
Result with Rest Create Account: Created By Authorized User in Named Credential

Result with Create Account: Created By Site Guest User
My Public Community Here: https://leeseifer-developer-edition.na168.force.com/ 🙂 Please Don’t Spam
